
Tuesday, December 4, 2012
Sunday, December 2, 2012
My new love: Crocheting
So I decided to teach myself to crochet. I made a Pinterest account and headed to youtube. I pinned all the different crocheting instruction videos on Pinterest. I would like to say thank you to all the people that have put videos on youtube that teach the basic stitches of crocheting! You guys ROCK! I am living proof they work. Here are a couple things I have made over the past couple of months.
 These are baby shoes with a matching headband. Now I need a grandchild! LOL!
 Another set.

I made at least 8 pairs of these wonderful gloves... Guess what people are getting for Christmas???? I encourage anyone that wishes to learn to crochet to check out the videos on youtube! They worked for me! Happy Crocheting!


I made at least 8 pairs of these wonderful gloves... Guess what people are getting for Christmas???? I encourage anyone that wishes to learn to crochet to check out the videos on youtube! They worked for me! Happy Crocheting!
Sunday, July 29, 2012
The Best Homemade Dog Bone Recipe!
So I have a pup-pup named Andie girl. I decided to try a couple recipes for homemade dog bone treats. After making a couple different recipes I came up with my own recipe based on the bones Andie liked best.

Ingredients:
1/4 cup Peanut Butter
1 Egg
1 tbsp Parsley
1/4 cup Beef Broth
1/4 cup Oats
1 cup Wheat or Rice Flour
Blend Peanut Butter, egg and parsley and then toss in the oats. Add flour and mix. The dough should not be sticky. Fairly dry but wet enough to stick together. Roll it out and cut out your bones or flowers depending on your cookie cutter choice.
Bake at 350 for 15 minutes. Take out the bones and flip them over and bake for another 15 minutes. Total bake time is 30 minutes.
Let them cool and the dog drooling will commence! My dog LOVES these bones! They are easy to make and your dog will think you are the best pet parent in the world!
Wednesday, June 27, 2012
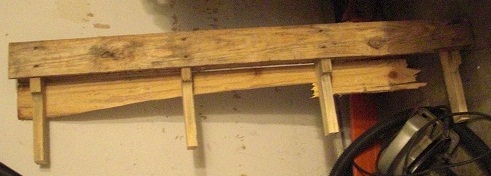
Pallet Potting Table
Materials:
2 2x4 8 feet long
1 2x2 8feet long
2 old pallets
Screws, Paint and sealer
Ready to be assembled:

Assembled:

Painted and sealed:

And how it fits in with the rest of my created items on the patio:


Tuesday, June 26, 2012
Upcycled small patio table
My hunny brought in a table stand and asked me if I wanted it... OF COURSE I DID! We had recently bought a new oven and it came enclosed in wood... This is the stand and piece of wood I created from the oven wood...


Upcycled plant table
So I had this piece left over from making my patio table..
I removed the four pieces of board sticking down to use for legs.
I then cut a piece three boards wide from another pallet and attached the legs. I painted and sealed my plant table and this is what I ended up with..

It is small but looks quite lovely on the patio and I don't have to bend so far to work on my plants.


Thursday, June 7, 2012

Amaretto Strawberries
This was a tip I picked up from an old friend.
Ingredients:
2 cups of fresh strawberries
1/4 cup sugar
1/4 cup amaretto

Wash the strawberries then slice them. Place the strawberries in a bowl and add the sugar and Amaretto. Stir gently. Place plastic wrap over the bowl and place in fridge for 1 hour minimal. The sugar will draw out the strawberry juice and the flavors marinate together. These are the best strawberries! Place it on ice cream, use in a strawberry shortcake recipe or other recipes that call for strawberries.

These strawberries will add another dimension of flavor. Enjoy!
Wednesday, June 6, 2012


Monday, June 4, 2012
Easy Caramel
Easy-Peasy Caramel
1 can of condensed milk
Pot
Water
2.5 hours
Fill a pot with water. Remove the label from the can of condensed milk. You can do more than one can. Place the can in the water. Make sure the top of the can is covered in water at all times. Bring the water to a boil and continue to boil for two and a half hours. Remove the can and let it cool completely. Open the can and Ta-Da.... Caramel!
Crumbled Chicken Zucchini Parmesan
I picked up a huge zucchini this weekend at the Farmer's Market and I mean HUGE! After thinking on it a bit, I decided to make a Zucchini with chicken Parmesan.
I started with a homemade red sauce.
Ingredients for red sauce:
1 can of 28 oz plum tomatoes
1/8 cup of olive oil
Pinch of kosher salt
Pinch of crushed red pepper flakes
2 small chopped sweet onions
3 cloves of chopped garlic
1 tsp sugar
Heat the olive of in a pan. Once hot, add the onions, garlic, crushed pepper flakes and salt. Cook for about 7 minutes until the onions are translucent then add the can of tomatoes and the sugar. I broke up my tomatoes with a potato smasher but a spoon will do as well. Let this simmer for a good 30 minutes.
Next I rounded up my supplies to fry my zucchini:
Zucchini
1 cup AP flour
1 cup Crushed Italian bread crumbs
4 eggs
2 tsp heavy cream or milk
Salt
Pepper
Vegetable oil

Ingredients for chicken burger:
2 chicken breast
Pinch of salt
Pinch of pepper
Pinch of Italian seasoning
Next I took two chicken breast and ground them up in my Food Processor. I added a pinch of Italian seasoning, salt and pepper and browned the meat in a pan.
Preheat oven to 350 degrees at this time.
Ingredients for Parmesan:
Red tomato sauce
Fried Zucchini slices
Crumbled chicken
1 cup of mozzarella cheese
Several slices of Provolone cheese
1 cup shredded Parmesan cheese
1 cup torn fresh Basil
I used a 8X8 pan. I laid down the red sauce first, then a layer of basil, then the zucchini slices, followed by the crumbled chicken, then slices of Provolone cheese, followed by the Parmesan cheese and finally the Mozzarella cheese. Rinse and repeat until the pan is full. I did 2 full layers and my pan was full. Toss it into the preheated oven.

Bake for 30 minutes and remove. Let it rest for about 5 minutes because it is HOT! Serve with bread, a salad and ENJOY!


Sunday, June 3, 2012

Saturday, June 2, 2012

Creamy Tomato Basil Soup.. YUM!
I had an urge for Jason's Deli tomato basil soup but sadly, I have recently moved and the nearest one is 2 hours away. I looked at a couple different recipes and each had something different so I tossed them aside and decided to do my own thing. I AM SO HAPPY I DID!

Ingredient List:
1 can of diced roasted tomatoes
1 can of Tomato Sauce
1 chopped onion
1 clove of garlic
1 cup of fresh chopped basil
1 tsp of fresh thyme
2 tsp Kosher salt
1/2 tsp pepper
1/4 tsp crushed red pepper flakes
1 cup of chicken broth
1 cup of chicken broth
1/2 cup of heavy cream
2 tsp butter
1 tbsp Olive Oil
1 tbsp feta cheese
Step one: Melt butter and add onions, garlic and 1 tsp salt. Cook until onions are translucent.
Step two: Combine all the other ingredients EXCEPT the Heavy Cream and feta cheese in a pot. Add the onions and garlic.
Step 3: Cook for 25 minutes on medium low heat.
Step 4: I used my immersion blend to cream the contents of the pot... skip this step if you prefer chunky soup.
Step 5: Add the 1/2 cup of heavy cream and 1 tbsp feta cheese, stir, cook for a couple more minutes and it is ready to serve.
Friday, June 1, 2012

Fresh Green Onions in a Jar
I am always looking for helpful hints for around the house. I am trying to move to a greener lifestyle. I have cut out margarine completely and have gone back to good old fashioned non-salted butter. Who wants to eat an item that is one ingredient away from plastic? Not I, besides I love me some butter!
Getting back to the point I read about keeping green onions or scallions on your counter, so you had fresh green onions at all times.
Items needed:
A bundle of green onions with roots attached
a glass jar... I love mason jars
water
scissors

Leave them to grow. I swear I walk out of my kitchen and come back 10 minutes later and a couple have grown 2 inches. I snip the onions as I need them. My onions are assorted sizes. In fact a couple need to be snipped and used.

Quick Easy Mini Dessert PIZZAS! Kids will love these
Last night my sweet tooth was biting me hard so I headed into the kitchen to make something to soothe it. HHHHMMMM.... Don't ask me why but pizza and chocolate were weighing heavily on my mind. I decided to combine the two and create a pizza with chocolate.
List of ingredients:
Canned biscuits

Chocolate chips
Marshmallows
Granola cereal
NUTELLA
Chopped Pecans
Optional: get creative
Frozen cookie dough for crust
Different type nuts
Different type nuts
M&M's
Coconut
Dried or fresh fruit
Jelly or jam
Caramel
Crushed graham crackers
Cinnamon or nutmeg
And so on...
Step one: Open the canned biscuits and separate them. Use a rolling pin and roll them VERY thin. Then roll the edges slightly inward to form a rim around the pizza. I used canned biscuits because I was lazy and didn't want to make pizza dough and wait on it to rest.

Step two: I added a sauce of sorts... NUTELLA!!! My hunny used crushed Granola cereal. You can use crushed Graham crackers if you want to go the Smores route. I then added chocolate chips, pecans, and placed the marshmallows on last.


Wednesday, May 30, 2012

Fingerless gloves... Heck yeah!

I decided to teach myself to crochet via the interwebs with videos and such. This site is awesome and helped me tremendously.
http://crochet.about.com/od/learntocrochet/tp/crochet-for-beginners.htm
After watching a video, I practiced a chain stitch and a single crochet stitch. I was ready to make SOMETHING!! So there was a pattern for fingerless gloves. They sounded pretty sweet. After about a hour of attempting to read the secret language of crocheting I grew frustrated and thought screw it, I will make my own pattern. I do that at times. So here we go.
Fingerless gloves pattern:
25-35 chain stitches for the first row... adjust for the size of your arm. Leave about 12" of yarn at the beginning knot for stitching the sides together at the end.
17- 25 rows of single crochet stitch... depends on the length you want them.
Last step is to put the two ends together. Using the yarn you saved earlier, weave the ends together. Make sure you leave an opening for the thumb. Turn to the right side and there you go a fingerless glove. Repeat for a matching set. I decorated mine with buttons and ribbons. Have fun!


Tuesday, May 29, 2012


Mint infused Vanilla Soda. No calories!

Ingredient List:
3 Vanilla Bean Stalks
1/4 cup fresh Mint
3/4 cup Splenda
4 cups Water
Sparkling Seltzer Water
Ice
Sprig of Mint
So I played in the kitchen quite a bit today. I tried out a homemade Ginger-ale recipe I saw floating around Pinterest. While I was doing this I decided to experiment and make a vanilla based syrup for a vanilla soda. I was hit with a heavenly idea.... Add MINT! So I trotted out to the garden and snipped 1/4 cup of fresh mint. I pulled out 3 vanilla bean stalks from my secret stash.
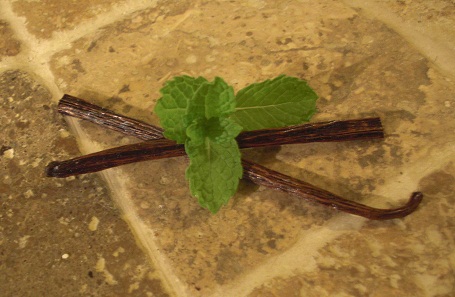
I chopped up the mint and cut the Vanilla stalks in half. I then sliced the vanilla bean stalks. I scraped out the goody from the stalk threw it, the Vanilla stalks and mint into a small saucepan. I added 4 cups of water and 3/4 cup of Splenda.
I brought it to a boil and let it simmer for a hour. I then turned the heat off and let the vanilla syrup cool. After it cooled, I strained it through cheesecloth into a glass jar for keeping. Make sure to refrigerate the syrup.
I added 3 Tablespoons of the syrup to 8 oz of sparkling Seltzer water. You can buy Seltzer water at most grocery stores. I tossed in some ice and a sprig of mint and YUM! Taste just like creme soda but with no calories! Enjoy!
Subscribe to:
Posts (Atom)